Quick Guide for Installing NVIDIA Driver, CUDA Toolkit and cuDNN
If you need GPU computing for your living, you probably used to install NVIDIA driver, CUDA Toolkit and cuDNN for your machine. The whole procedures are non-trivial and you may feel clueless if something go wrong in the mid. This guide aims to offer you clear instructions with things you should pay attention.
Motivations
If you work in machine learning or deep learning, you probably have experience installing NVIDIA driver, CUDA Toolkit and cuDNN. They are essential softwares to enable GPU computing for most Deep Learning frameworks. But installing them correctly can be tricky. Any step goes wrong could leave you clueless of what to do.
This post offers you a quick guide to installing NVIDIA driver, CUDA Toolkit and cuDNN, coupled with things you should pay attention to. This guide consolidates the resources I used when I installed the same for my GPU server.
Step 1: Install NVIDIA Driver
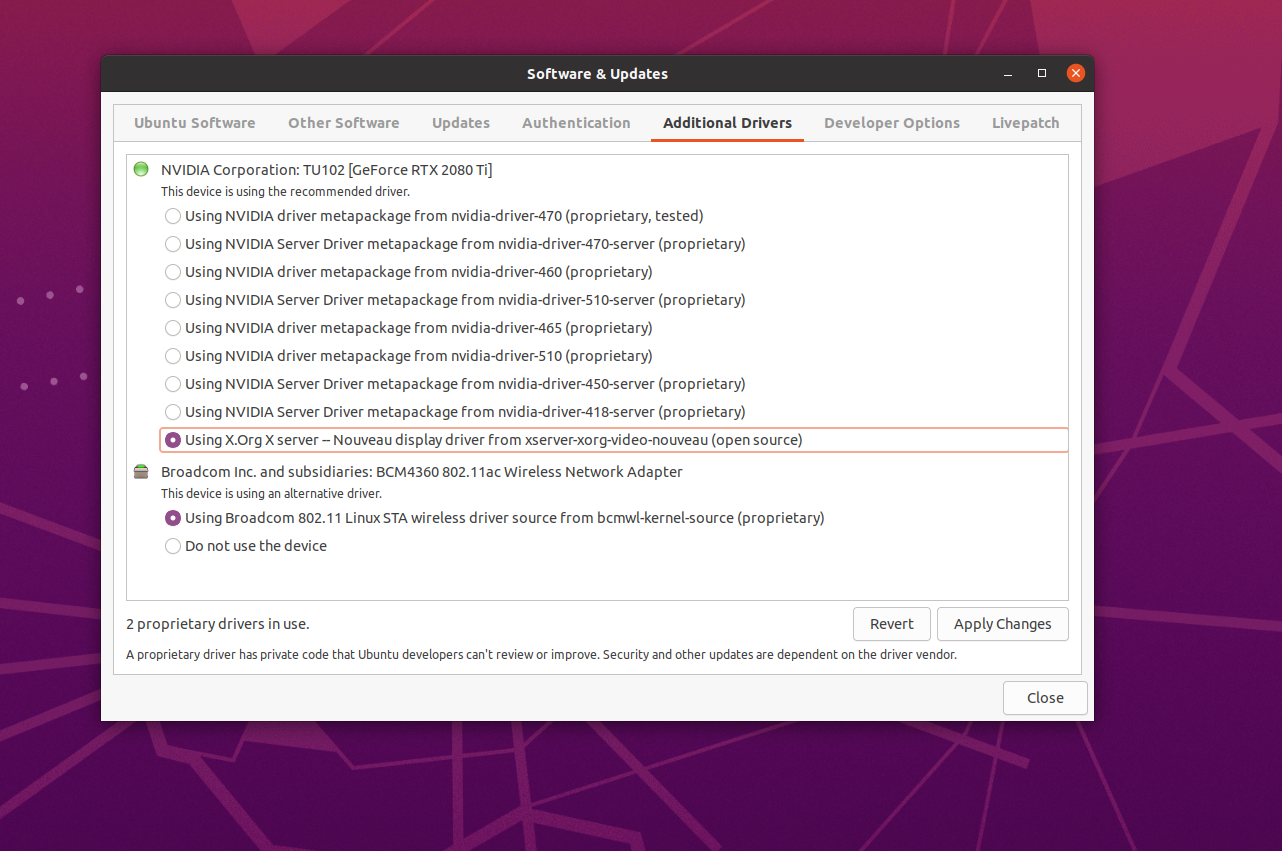
Option 1: Install via “Software & Updates”
- From “Software & Updates”, go to “Additional Drivers” for available GPU drivers you can install
- Choose the driver you need (those labelled as “proprietary, tested” is more flavorable)
- Click “Apply Changes” and wait for the installation to complete
- Reboot your machine
Option 2: Install via Command Line
- Search for available NVIDIA drivers in your terminal
apt search nvidia-driver - Update your package repository
sudo apt update sudo apt upgrade - Install the NVIDIA driver that you need (in my case, I installed
nvidia-driver-470)sudo apt install nvidia-driver-470 - Reboot your machine
If successful, you should be able to run the command nvidia-smi after reboot. The following is a sample output:
alex@alex-desktop:~$ nvidia-smi

Thu Mar 31 17:12:04 2022
+-----------------------------------------------------------------------------+
| NVIDIA-SMI 470.103.01   Driver Version: 470.103.01   CUDA Version: 11.4     |
|-------------------------------+----------------------+----------------------+
| GPU  Name        Persistence-M| Bus-Id        Disp.A | Volatile Uncorr. ECC |
| Fan  Temp  Perf  Pwr:Usage/Cap|         Memory-Usage | GPU-Util  Compute M. |
|                               |                      |               MIG M. |
|===============================+======================+======================|
|   0  NVIDIA GeForce ...  Off  | 00000000:01:00.0  On |                  N/A |
| 30%   35C    P8    21W / 250W |    276MiB / 11019MiB |      2%      Default |
|                               |                      |                  N/A |
+-------------------------------+----------------------+----------------------+
|   1  NVIDIA GeForce ...  Off  | 00000000:02:00.0 Off |                  N/A |
| 30%   33C    P8     2W / 250W |     10MiB / 11019MiB |      0%      Default |
|                               |                      |                  N/A |
+-------------------------------+----------------------+----------------------+

+-----------------------------------------------------------------------------+
| Processes:                                                                  |
|  GPU   GI   CI        PID   Type   Process name                  GPU Memory |
|        ID   ID                                                   Usage      |
|=============================================================================|
|    0   N/A  N/A      1019      G   /usr/lib/xorg/Xorg                 71MiB |
|    0   N/A  N/A      1612      G   /usr/lib/xorg/Xorg                 91MiB |
|    0   N/A  N/A      1739      G   /usr/bin/gnome-shell              100MiB |
|    1   N/A  N/A      1019      G   /usr/lib/xorg/Xorg                  4MiB |
|    1   N/A  N/A      1612      G   /usr/lib/xorg/Xorg                  4MiB |
+-----------------------------------------------------------------------------+
Step 2: Install CUDA Toolkit
- Download the
.debfile of your desired CUDA Toolkit version- Here is a menu of all CUDA Toolkit archive
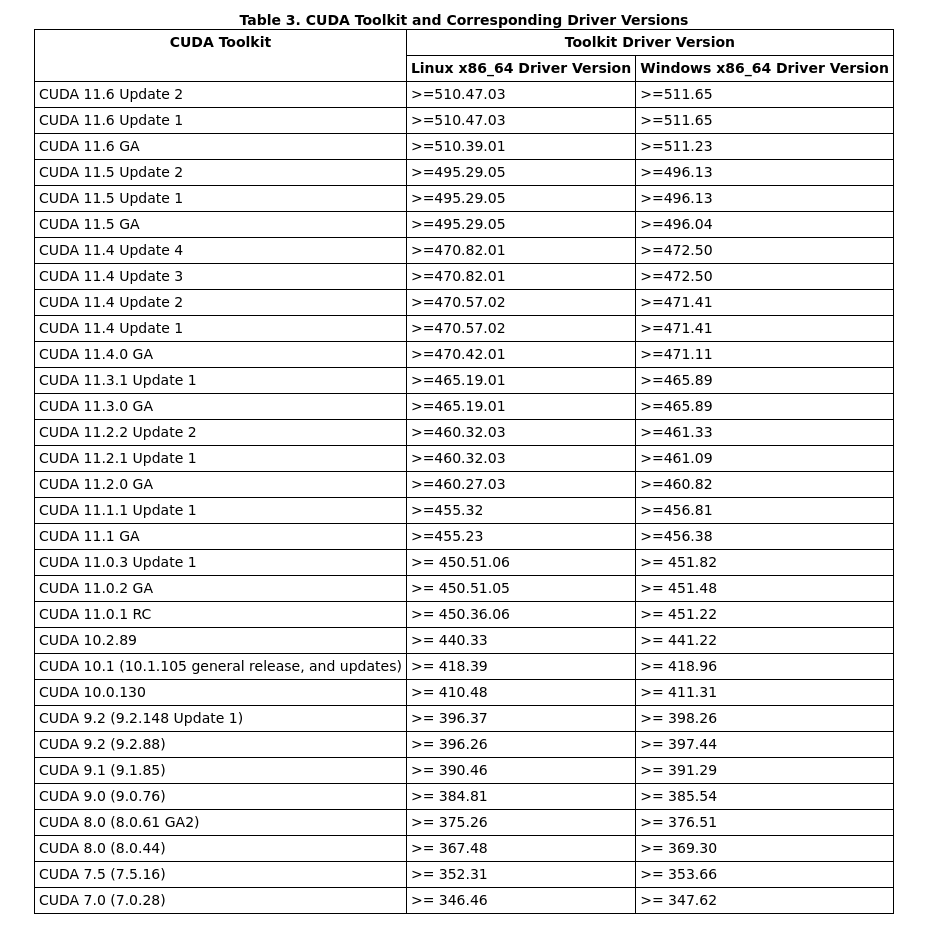
(you need to register a NVIDIA membership to view the page) - This chart summarizes what version of CUDA Toolkit is compatible with your NVIDIA driver
(extracted from CUDA Toolkit documentation)
- Here is a menu of all CUDA Toolkit archive
- Run the following commands in your terminal to install CUDA Toolkit. Make sure the current directory contains the downloaded
.debfile (in my case I installed CUDA Toolkit 11.4)dpkg -i cuda-repo-ubuntu2004-11-4-local_11.4.0-470.42.01-1_amd64.deb sudo apt-key add /var/cuda-repo-ubuntu2004-11-4-local/7fa2af80.pub sudo apt-get update sudo apt-get install cuda - Append the following environment variables in your
~/.bashrcfileexport PATH=${PATH}:/usr/local/cuda-11.4/bin export CUDA_HOME=${CUDA_HOME}:/usr/local/cuda:/usr/local/cuda-11.4 export LD_LIBRARY_PATH=${LD_LIBRARY_PATH}:/usr/local/cuda-11.4/lib64 - Run
source ~/.bashrcin your terminal to update the environment variables of your bash session
If successful, you should be able to run the command nvcc --version. Here is a sample output:
alex@alex-desktop:~$ nvcc --version
nvcc: NVIDIA (R) Cuda compiler driver
Copyright (c) 2005-2021 NVIDIA Corporation
Built on Wed_Jun__2_19:15:15_PDT_2021
Cuda compilation tools, release 11.4, V11.4.48
Build cuda_11.4.r11.4/compiler.30033411_0
First, I dont suggest to install CUDA Toolkit via package repository (i.e.
sudo apt-get install cuda) because it would install outdated version. I got CUDA Toolkit version 10.x when installed via package repository.Second, I suggest to delete the old
.deb files from your current directory before running sudo apt-get intsall cuda because it would pick up the latest version of .deb file in the folder for installation.Finally, double check the CUDA Toolkit version to be installed is compatible with your NVIDIA driver based on the
.deb filename. For example, mine is cuda-repo-ubuntu2004-11-4-local_11.4.0-470.42.01-1_amd64.deb, so it is compatible with NVIDIA driver 470.
Step 3: Install cuDNN
- Download the
.tgzfile of your desired cuDNN version- Here is a menu of all cuDNN archives. Pick the one compatible with your CUDA Toolkit version (e.g. Mine is cuDNN v8.2.4 for CUDA 11.4)
- Run the following commands in your terminal to install cuDNN. Make sure the current directory contains the downloaded
.tgzfile (In my case, I installed cuDNN version 8.2.4)tar -xzvf cudnn-11.4-linux-x64-v8.2.4.15.tgz sudo cp cuda/include/cudnn.h /usr/local/cuda/include sudo cp cuda/lib64/libcudnn* /usr/local/cuda/lib64 sudo chmod a+r /usr/local/cuda/include/cudnn.h \ /usr/local/cuda/lib64/libcudnn*
.tgz filename to make sure it is compatible with your CUDA Toolkit version. For example, mine is cudnn-11.4-linux-x64-v8.2.4.15.tgz, so it’s compatible with CUDA Toolkit 11.4
How Do I Know Everything is Working?
A straight-forward way to tell is to install CUDA version of any Deep Learning framework (e.g. PyTorch, Tensorflow, JAX) and see if they managed to detect your GPU devices.
The following Python code help you validate CUDA is working in each framework:
# PyTorch
import torch
torch.cuda.is_available()

# Tensorflow
import tensorflow as tf
tf.config.list_physical_devices('GPU')

# JAX
import jax
jax.devices()
What If I Failed the Installation?
it is not uncommon to encounter something unexpected during your installation (e.g. you got an error during CUDA installation, or command nvcc --version doesn’t work after installing CUDA Toolkit).
Fear Not! What you need to do is to remove all of your installations (i.e. NVIDIA Driver, CUDA Toolkit, cuDNN) and try the installation from scratch again.
To remove all of your installations, run the following commands in your terminal:
apt clean
apt update
apt purge cuda
apt purge nvidia-*
apt autoremove